
Oh Red Velvet, how I love you! You can read all about Red Velvet Cake and view my recipe for Red Velvet Cupcakes here.
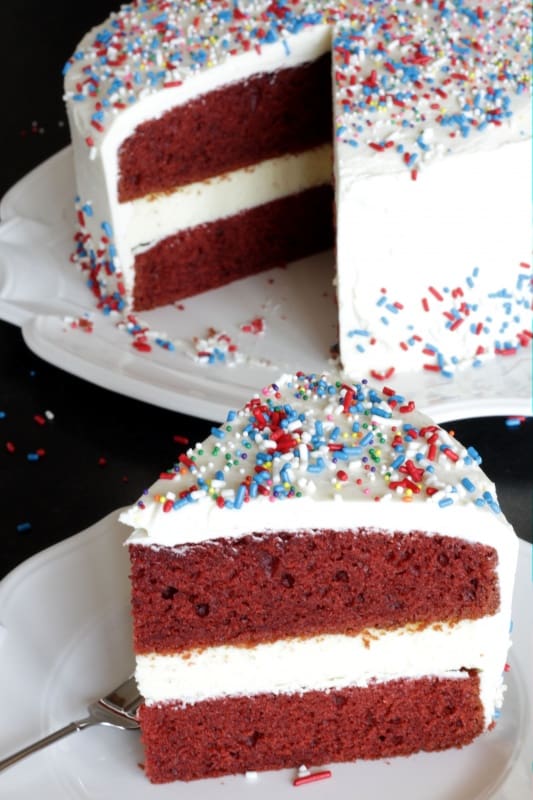
 The cake part of the Red Velvet Cheesecake Cake is made with the same recipe as for my Red Velvet Cupcakes and also has the same frosting. PLUS, there’s a luscious layer of cheesecake in between the cake layers. I know! It’s insanity and genius at the same time! We are obsessed with this cake.
Although making this cake involves several steps, I can assure you that none of them are difficult and that it’s best if you don’t do them all on the same day.
 If you wish, the cheesecake layer can be made and kept frozen for up to two weeks. The frosting can be made and chilled a day before assembling the cake and the entire cake can be assembled and frosted a day before serving and chilled overnight. We found the texture of the cake and cheesecake improved after a day in the fridge.
 Variations: You may use Cream Cheese Frosting with this cake; it’s a completely delicious and classic combination. I have also made just the cake layers without the cheesecake and filled and frosted them with Cream Cheese Frosting and the cake was nearly as amazing as if it had the cheesecake layer.

Red Velvet Cheesecake Cake
Ingredients
Cheesecake Layer
- 16 ounces (450 g) cream cheese at room temperature
- ⅔ cup (130 g) granulated sugar
- Pinch of salt
- 2 eggs
- ⅓ cup (75 g) sour cream
- 1 teaspoon vanilla extract
Red Velvet Cake Layers
- 2 ½ cups (350 g) all-purpose flour
- 1 ½ cups (300 g) granulated sugar
- 1 teaspoon baking soda
- 1 teaspoon salt
- 2 tablespoons cocoa powder
- 1 cup (240 ml) oil
- 1 ¼ cup (300 ml) buttermilk
- 2 eggs
- 2 tablespoons liquid or ½ ounce (14 g) red gel food coloring
- 1 teaspoon vinegar
- 1 teaspoon vanilla extract
Original Red Velvet Frosting
- 6 tablespoons 50 g all-purpose flour
- 1 cup 240 ml water
- 1 cup 225 g butter, room temperature
- 1 cup 200 g granulated sugar
- 1 teaspoon vanilla extract
Instructions
- For the Cheesecake Layer: Preheat oven to 325°F (160°C). Grease the bottom and sides of a 9-inch (23 cm) round cake pan and line the bottom of the pan with a circle of parchment paper. In a large mixing bowl, beat cream cheese with an electric mixer until it is smooth and creamy. Mix in the sugar and salt and blend for two minutes, scraping the bowl occasionally. Add the eggs, one at a time, and mix until blended. Add the sour cream and vanilla and beat until smooth and blended, being careful not to overbeat. Pour the batter into the prepared pan. Bake the cheesecake for 40-45 minutes until it is set to the touch and no longer jiggles. Remove from the oven and leave in the pan on a wire rack until completely cooled. Cover pan with plastic wrap or aluminum foil and place in the freezer until you assemble the cake, for several hours at least.
- For the Red Velvet Cake Layers: Preheat oven to 350°F (170°C). Grease and flour two 9-inch (23 cm) round baking pans. In a medium bowl, sift together flour, sugar, baking soda, salt and cocoa powder. In a large mixing bowl using a hand-held electric mixer, gently beat together the oil, buttermilk, eggs, food coloring, vinegar and vanilla.* Add the sifted flour mixture and mix until smooth and thoroughly combined. Pour batter into prepared pans. Bake for 24-30 minutes, until toothpick inserted in center comes out with moist crumbs attached. Cool in pans on a wire rack for 10 minutes, loosen edges of cake from sides of pans, and invert cakes onto wire racks to cool completely.
- For the Original Red Velvet Frosting: whisk together flour and water in a medium saucepan and cook over medium heat, stirring constantly, until the mixture becomes very thick and pudding-like. Cover and set aside to cool to room temperature (at least 2 hours).** Using a stand mixer fitted with the whisk attachment, beat butter, sugar and vanilla on high speed, scraping bowl with a rubber spatula occasionally, until lightened. Add the cooled flour mixture and beat on high until airy and fluffy. It should have a light and silky texture with no remaining sugar crystals.
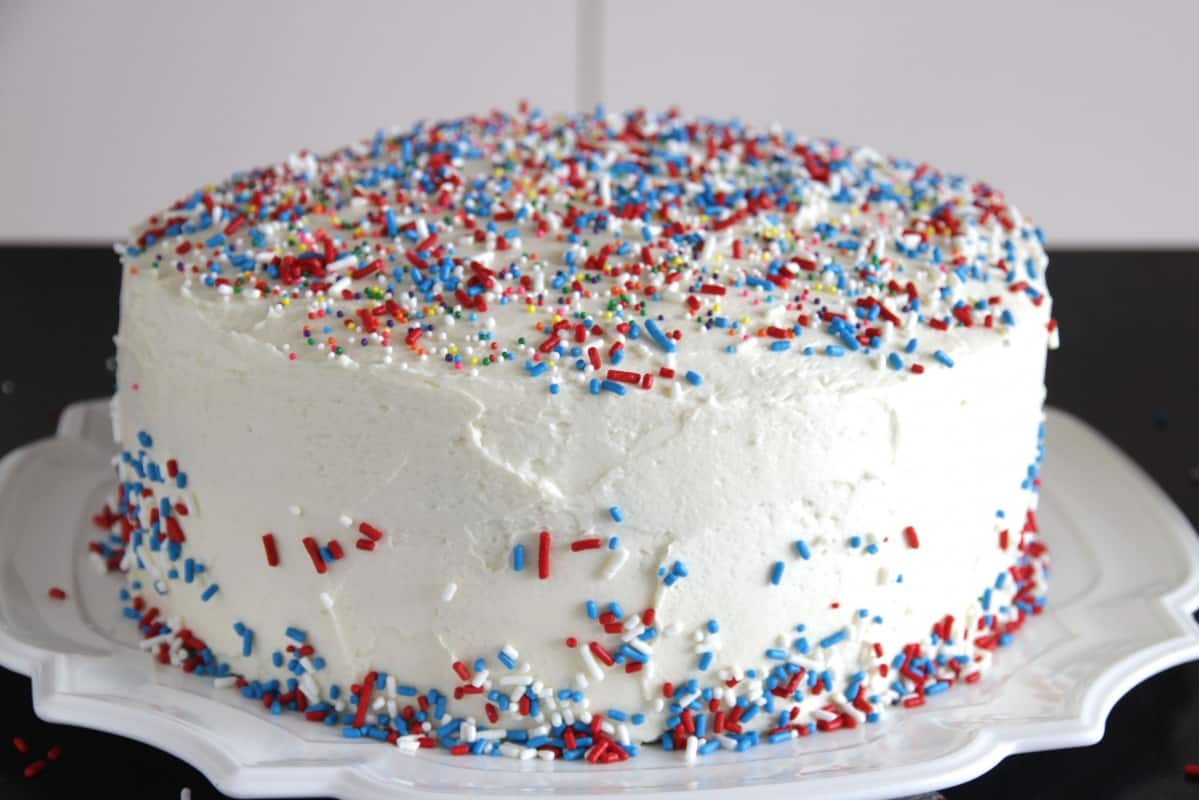
- To assemble the cake: place one Red Velvet Cake layer on a cake platter. Remove the cheesecake from the freezer, take it out of the pan and peel off the parchment paper.*** Lay the cheesecake on top of the Red Velvet Cake layer. Place the second Red Velvet Cake layer on top of the cheesecake. Cover the top and sides of the cake with a thin layer of frosting. This is your “crumb coat.” Don’t worry about being perfect at this point. Place the cake in the refrigerator for 30 minutes to set the crumb coat. Apply the second layer of frosting to the top and sides of the cake. Decorate as desired. Store cake in refrigerator.
Notes
**Cook the flour and water mixture before making the cake layers so it has time to cool.
***If you have trouble removing the frozen cheesecake from the pan, try setting the pan into a larger pan filled with hot water for a minute or two to help loosen it from the pan. Should your cheesecake layer be slightly larger than your cake layers, move it to a cutting board and trim the edges down with a sharp knife. Adapted from Recipe Girl.
Leave a Reply